Battery switch on travel trailer function is crucial for managing your RV’s power. Understanding how these switches work—whether it’s a simple 1-2-both or a more complex system—is key to avoiding electrical issues and maximizing your camping experience. This guide breaks down the types of switches, their operation, maintenance, troubleshooting, and potential upgrades, equipping you to confidently handle your travel trailer’s power.
We’ll cover everything from safely switching between house and chassis batteries to identifying common problems and their solutions. Think of this as your comprehensive guide to mastering your travel trailer’s electrical heart!
Understanding Battery Switches in Travel Trailers
Knowing how your travel trailer’s battery switch works is crucial for managing power and preventing problems. This guide explains the different types of switches, their functions, and how to locate them.
Types of Battery Switches
Travel trailers typically use one of two main types of battery switches: a simple on/off switch and a more complex switch offering multiple positions. The choice depends on the number of batteries and the desired level of control.
Simple On/Off Battery Switches, Battery switch on travel trailer function
These switches are the simplest type. They provide a single on and off position, effectively connecting or disconnecting the battery from the trailer’s electrical system. They’re often found in smaller trailers with a single battery. While simple, they lack the flexibility of multi-position switches.
Multi-Position Battery Switches (1-2-Both-Off)
These switches offer more control. A common type is the 1-2-Both-Off switch.
- 1: Connects only the main (typically house) battery to the trailer’s electrical system.
- 2: Connects only the auxiliary (typically starting) battery to the trailer’s electrical system.
- Both: Connects both batteries to the trailer’s electrical system, combining their power.
- Off: Disconnects both batteries from the trailer’s electrical system.
This allows for separate charging and use of batteries, preventing deep discharge of one battery while preserving the other. For instance, you might use the ‘Both’ position when running appliances, and ‘1’ when only charging the house battery.
Locating the Battery Switch
The battery switch location varies greatly depending on the manufacturer and model of the travel trailer. However, common locations include:
- Near the batteries themselves: This is a frequent location for easy access.
- Inside a compartment near the tongue of the trailer: Often near other electrical components.
- Inside a dedicated electrical panel: If the trailer has a more extensive electrical system.
- In the main control panel inside the trailer: Less common but possible.
To find it, carefully check these areas. The switch itself will typically be labeled, though the labeling might be small or faded. Look for a switch with multiple positions or clearly marked “Battery” or “Battery Disconnect”. If you’re still unsure, consulting your trailer’s owner’s manual is highly recommended.
Comparison of Battery Switch Types
| Feature | Simple On/Off | Multi-Position (1-2-Both-Off) |
|---|---|---|
| Number of Positions | 2 (On/Off) | 4 (1-2-Both-Off) |
| Battery Control | Single, combined battery control | Individual and combined battery control |
| Complexity | Simple | More complex |
| Flexibility | Limited | High |
Battery Switch Operation and Procedures
Properly operating your travel trailer’s battery switch is crucial for managing power and preventing damage to your batteries and electrical system. Understanding the procedure and potential problems will help ensure a smooth and safe camping experience. This section details safe switching procedures, potential consequences of errors, and troubleshooting common issues.
Safe Switching Between House and Chassis Batteries
Switching between your house and chassis batteries involves carefully selecting the appropriate position on your battery switch. Before making any changes, always ensure the engine is off and any loads (lights, appliances) are turned off to avoid arcing or damage. Typically, you’ll find three positions: “Both,” “House,” and “Chassis.” “Both” connects both batteries, “House” connects only the house battery, and “Chassis” connects only the chassis battery (used for starting the vehicle).
To switch, firmly move the switch lever to the desired position, ensuring it clicks into place. Listen for any unusual sounds – clicking or sparking may indicate a problem. After switching, verify power is available to the appropriate systems by checking lights or appliances.
Consequences of Incorrect Battery Switch Operation
Incorrectly operating the battery switch can lead to several problems. For example, accidentally connecting the house and chassis batteries in a way that creates a short circuit can damage the batteries, alternator, or other components of your electrical system. This can result in expensive repairs. Switching to the wrong position when charging may cause overcharging of one battery and undercharging of another, shortening their lifespan.
Additionally, inadvertently draining one battery while the other is connected could lead to a dead battery and leave you stranded.
Troubleshooting Common Battery Switch Problems
No Power: If you have no power after switching, first verify the switch is in the correct position and firmly engaged. Check the battery connections for corrosion or looseness. Test the batteries themselves with a voltmeter to ensure they have sufficient charge. If the problem persists, there might be a blown fuse or a fault in the wiring.Intermittent Power: Intermittent power suggests a loose connection somewhere in the system.
Inspect all wiring connections, paying close attention to the battery terminals and the switch itself. A corroded connection can cause intermittent contact. If the problem persists after cleaning connections, there might be an issue with the switch itself or a more serious wiring fault requiring professional attention.
Battery Switch Operation Flowchart
A simple flowchart visually represents the steps:[Imagine a flowchart here. The flowchart would start with a rectangle labeled “Turn off all loads and engine”. This would connect to a diamond labeled “Desired Battery Position?”. From the diamond, three arrows would branch to rectangles: “Both,” “House,” and “Chassis.” Each of these would connect to a rectangle labeled “Move switch to selected position,” then to a diamond labeled “Power verified?”.
A “yes” branch would lead to a rectangle labeled “Operation complete,” while a “no” branch would lead to a rectangle labeled “Check connections, fuses, and batteries.”]
Battery Switch Maintenance and Safety
Keeping your travel trailer’s battery switch in top condition is crucial for reliable power and preventing potential hazards. Regular maintenance ensures your system operates safely and efficiently, extending the lifespan of your batteries and electrical components. Neglecting maintenance can lead to costly repairs and even dangerous situations.Regular maintenance tasks for your battery switch are simple but vital. Consistent attention will pay off in peace of mind and dependable power on the road.
Regular Maintenance Tasks
Performing these routine checks will help identify and address potential issues before they become major problems. This proactive approach minimizes the risk of electrical failures and ensures your batteries are always ready when you need them.
- Visual Inspection: Monthly, visually inspect the switch for any signs of damage, such as cracks, loose connections, or corrosion on the terminals. Look for any unusual wear or discoloration that might indicate overheating.
- Tighten Connections: Check all terminal connections for tightness. Loose connections can lead to poor contact, overheating, and even fire hazards. Use the appropriate wrench to ensure a secure connection. Never over-tighten, as this can damage the terminals.
- Clean Terminals: Clean battery terminals and switch terminals with a wire brush and baking soda solution to remove corrosion. Corrosion significantly impedes electrical conductivity, leading to reduced power and potential system failure. After cleaning, apply a corrosion inhibitor to prevent future build-up.
- Switch Operation Test: Regularly test the switch’s functionality. Turn the switch on and off, confirming it moves freely and engages correctly. Listen for any unusual sounds that could signal a problem.
Inspecting Connections and Wiring for Corrosion
Corrosion is a silent enemy of electrical systems. It reduces conductivity, leading to reduced power output, overheating, and ultimately, failure. Corrosion is often more prevalent in damp or humid environments, so extra care is needed in these conditions.Corrosion manifests as a white, green, or blue powdery substance on the terminals and wires. It’s crucial to identify and address it promptly.
So, you’re planning a trip? Awesome! Don’t forget travel insurance! Check out Aon travel insurance for options covering eco-tourism adventures. They’ve got solid plans, and if you’re into something a bit more adventurous like exploring ancient ruins, Aon travel insurance also offers coverage for those types of trips too. Seriously, getting insured is a total lifesaver – peace of mind is priceless!
The longer corrosion is left unchecked, the more difficult it becomes to remove and the greater the damage to the components. Ignoring corrosion can lead to significant performance degradation and safety risks.
Safety Precautions When Working with Battery Switches and Batteries
Working with batteries and electrical systems always presents potential hazards. Following these safety measures is paramount to avoid injury or damage.
- Disconnect Power: Always disconnect the negative (-) battery terminal before working on any part of the electrical system, including the battery switch. This prevents accidental shocks and short circuits.
- Wear Protective Gear: Wear safety glasses to protect your eyes from sparks or acid splashes. Gloves protect your hands from corrosion and potential acid burns.
- Ventilation: Batteries produce hydrogen gas, which is highly flammable. Work in a well-ventilated area to avoid the risk of explosion.
- Proper Tools: Use insulated tools to prevent accidental shocks. Never use damaged or worn-out tools.
- Know Your System: Understand the electrical system of your travel trailer before working on it. If unsure, consult a qualified electrician.
Potential Hazards of Improper Battery Switch Usage
Improper use of the battery switch can lead to several dangerous situations. Understanding these hazards allows for safer and more responsible operation.
- Electrical Fires: Loose connections, corrosion, or damaged wiring can cause overheating and potentially lead to electrical fires.
- Battery Explosions: Improper handling of batteries, especially in poorly ventilated areas, can result in the release of flammable hydrogen gas, leading to explosions.
- Electrical Shocks: Working on the electrical system without disconnecting power or wearing proper safety gear can result in serious electrical shocks.
- System Failure: Corrosion and loose connections can cause system failures, leaving you without power when you need it most.
- Damage to Electrical Components: Improper use can damage expensive components like inverters, chargers, and other sensitive electronics.
Battery Switch and Electrical System Integration
Your battery switch is the central control point for your travel trailer’s 12-volt DC system. It dictates which batteries (or combination of batteries) power your appliances and accessories. Understanding its interaction with the rest of your electrical system is key to safe and efficient operation. This section will explain how the switch manages power flow and how to correctly connect a new battery.The battery switch acts as a crucial link between your batteries and the rest of your trailer’s 12V DC system.
It allows you to isolate or connect different batteries (like a chassis battery and a house battery) to power various circuits. This selective control prevents unwanted drain on one battery while another is being charged or provides backup power in case of failure. It also helps in managing the charging process of each battery independently.
Power Distribution Management
The battery switch’s primary function is managing the flow of power from your batteries to the various electrical components in your RV. With the switch in the “off” position, all power is cut to the house battery circuits, protecting them from discharge. In the “both” position, both batteries feed the system, potentially providing more power for high-demand appliances. In the “house” position, only the house battery powers the systems.
This arrangement allows for independent charging and use of the house battery. The chassis battery, typically responsible for starting the vehicle’s engine, remains separate but can be connected through appropriate switching arrangements. Improper use can lead to discharged batteries or damage to electrical components.
Connecting a New Battery
Before connecting a new battery, always disconnect the negative terminal of the existing battery to prevent short circuits. Then, carefully connect the new battery’s positive terminal to the positive terminal of the battery switch and the negative terminal to the negative terminal of the battery switch, ensuring clean and secure connections. Tighten all connections firmly to avoid corrosion and power loss.
After making the connections, carefully re-connect the negative terminal of the existing battery and check all connections for tightness. Finally, use the battery switch to test the system, checking that the new battery is providing power.
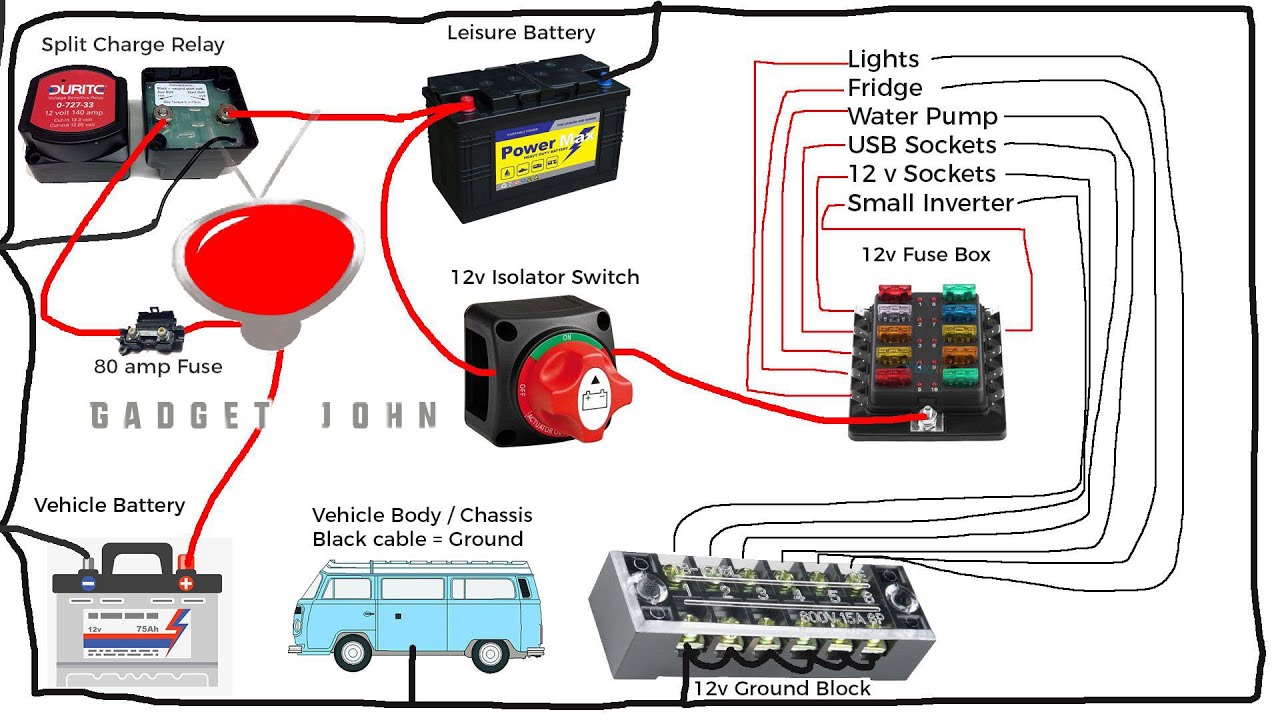
Power Flow Diagram
Imagine a simple diagram: Two batteries (House and Chassis) are each connected to a three-position switch (Off, House, Both). The output of the switch leads to a distribution panel feeding lights, appliances, and other loads. Diagram (textual representation):* Without Switch Engaged (Off): Both batteries are electrically isolated from the load. No power flows to the trailer’s electrical system.* Switch Engaged (House): Power flows from the House battery through the switch to the distribution panel, powering the connected loads.
The Chassis battery remains disconnected.* Switch Engaged (Both): Power flows from both the House and Chassis batteries, in parallel, through the switch to the distribution panel. This provides increased current capacity, allowing higher-demand appliances to operate. The load is shared across both batteries.Remember: This is a simplified diagram. Real-world systems might include fuses, circuit breakers, and other safety devices within the power flow path.
Always consult your RV’s wiring diagram for specifics.
Common Battery Switch Issues and Solutions
Properly functioning battery switches are crucial for reliable power in your travel trailer. A malfunctioning switch can leave you stranded without lights, appliances, or the ability to charge your batteries. Understanding common problems and their solutions can save you time, frustration, and potentially costly repairs.
Identifying Common Battery Switch Problems
Five common problems with travel trailer battery switches include: corrosion on the switch terminals, a faulty switch mechanism, loose or damaged wiring, incorrect switch settings, and a blown fuse within the switch assembly (if applicable). These issues can manifest in various ways, impacting your ability to use your trailer’s electrical system effectively. Addressing these problems promptly ensures the safety and functionality of your electrical system.
Troubleshooting and Solutions for Battery Switch Problems
Let’s address each problem individually:
- Corrosion on Switch Terminals: Corrosion prevents proper electrical contact. Solution: Disconnect the battery cables from the switch. Clean the terminals thoroughly with a wire brush and baking soda solution. Apply a dielectric grease to the terminals after cleaning to prevent future corrosion. Reconnect the cables, ensuring a tight connection.
- Faulty Switch Mechanism: The switch itself may be internally damaged and not make proper contact. Solution: If cleaning the terminals doesn’t solve the problem, the switch may need replacement. Purchase a replacement switch of the same type and amperage rating. Carefully disconnect the wiring from the old switch, noting the wiring configuration before disconnecting. Install the new switch, ensuring the wiring is correctly connected.
- Loose or Damaged Wiring: Loose or damaged wiring can lead to intermittent power or complete power loss. Solution: Inspect all wiring connected to the battery switch for damage or looseness. Tighten any loose connections. Repair or replace any damaged wiring. Ensure all connections are secure and properly insulated.
- Incorrect Switch Settings: The switch may be inadvertently set to the wrong position, preventing power from reaching the batteries or appliances. Solution: Carefully review the switch’s operating instructions. Ensure the switch is in the correct position to supply power to your desired circuits (e.g., batteries, house, or both).
- Blown Fuse (if applicable): Some battery switches incorporate fuses. A blown fuse will interrupt power flow. Solution: Check the fuse within the switch assembly (if present). Replace it with a fuse of the same amperage rating. If the fuse blows repeatedly, there’s likely a short circuit in the wiring that needs to be addressed.
Testing Battery Switch Functionality with a Multimeter
A multimeter is invaluable for diagnosing battery switch issues. To test continuity, set the multimeter to the ohms setting (Ω). Place one multimeter lead on one terminal of the switch and the other lead on the corresponding output terminal. If the switch is correctly closed, the multimeter should read near zero ohms, indicating a good connection. A high reading or “OL” (overload) indicates a problem with the switch or wiring.
To test voltage, set the multimeter to the DC voltage setting (V). With the switch closed, measure the voltage across the battery terminals and then at the output terminals of the switch. A significant voltage drop indicates a problem with the switch or wiring. Always disconnect the negative battery cable before performing any electrical testing.
So, you’re planning a trip? Awesome! Don’t forget to sort out your travel insurance. For comprehensive coverage, check out aon travel insurance ; they’ve got you covered for a wide range of situations. And if you’re feeling adventurous and planning something a little more off the beaten path, consider aon travel insurance again – they often have specific policies for unique travel experiences.
Getting insured is a small price to pay for peace of mind, right?
Common Symptoms, Causes, and Solutions
| Symptom | Likely Cause | Solution |
|---|---|---|
| No power to appliances | Blown fuse, faulty switch, corroded terminals, incorrect switch setting, loose wiring | Check fuse, inspect switch, clean terminals, verify switch setting, check wiring |
| Intermittent power | Loose wiring, corroded terminals | Tighten connections, clean terminals |
| Low battery voltage | Parasitic drain, faulty charging system | Investigate parasitic drain, check charging system |
| Switch feels loose or unresponsive | Faulty switch mechanism | Replace the switch |
Battery Switch Upgrades and Alternatives: Battery Switch On Travel Trailer Function
Upgrading your travel trailer’s battery switch can significantly improve your power management and overall camping experience. Standard switches often lack the features and reliability of more modern options, leading to potential frustrations and even safety concerns. This section explores some popular upgrades and alternatives, comparing their strengths and weaknesses to help you make an informed decision.Many RV owners find that the basic battery switch included with their travel trailer is inadequate for managing multiple batteries or complex power systems.
Upgrading offers increased control, improved safety features, and often enhanced longevity. Several alternatives provide distinct advantages depending on your needs and budget.
Types of Battery Switch Upgrades
Several upgrade paths exist, each offering different benefits. These range from simple replacements with higher-capacity switches to sophisticated electronic systems offering remote control and monitoring capabilities. The choice depends on factors like the number of batteries, your electrical system’s complexity, and your budget.
Direct Replacement with a Higher-Capacity Switch
A straightforward upgrade involves replacing your existing battery switch with a larger, more robust model. These often feature higher amperage ratings, improved contact points, and more durable construction. For example, upgrading from a 100-amp switch to a 200-amp switch provides better handling of higher current demands, reducing the risk of overheating and premature failure. The installation typically involves disconnecting the existing switch, carefully noting wire connections, and installing the new switch, ensuring all connections are secure and correctly labeled.
This is generally a simple upgrade for someone with basic electrical skills.
Smart Battery Switches with Remote Monitoring
These advanced switches offer remote control and monitoring capabilities, allowing you to manage your batteries from anywhere within your RV, or even remotely via an app (depending on the model). Features may include low-voltage alarms, individual battery monitoring, and automatic switching based on pre-set parameters. For instance, a smart switch could automatically switch to your auxiliary battery when the main battery is low, preventing a complete power outage.
These systems typically involve more complex installation, potentially requiring additional wiring and possibly the integration of a control panel or app interface.
Battery Isolators
Battery isolators are another popular upgrade. Unlike switches, they allow multiple batteries to charge independently but also combine their power for use. This is particularly useful when you have a solar panel charging one battery while simultaneously using power from another. Installation is generally simpler than installing a smart switch but requires an understanding of your charging system. The internal workings typically involve diodes or relays that allow current to flow in one direction only, preventing backfeeding and ensuring efficient charging.
Illustrative Descriptions of Battery Switch Designs
A standard battery switch is essentially a multi-position rotary switch with multiple terminals for connecting batteries and loads. Internally, it uses robust copper contacts to switch current flow. The contacts wear down over time with repeated use, a major source of failure.A higher-capacity switch may have larger contact points, better insulation, and a more durable housing to withstand higher amperage.
A smart switch would additionally contain microprocessors, sensors, and communication modules for remote control and monitoring. These components are integrated into a compact unit, often with a user-friendly interface.A battery isolator uses diodes or relays within its circuitry. Diodes allow current to flow in one direction only, while relays provide controlled switching. The internal components are designed to handle significant currents with minimal voltage drop.
The physical design is typically more compact than a standard battery switch.
Mastering your travel trailer’s battery switch isn’t just about avoiding dead batteries; it’s about ensuring a safe and enjoyable camping experience. By understanding the different switch types, performing regular maintenance, and knowing how to troubleshoot common issues, you’ll be prepared for anything the road throws your way. So, go forth and power up your adventures!
Expert Answers
What happens if I accidentally switch my batteries to the “off” position?
You’ll lose power to the connected systems (either house or chassis, depending on your switch configuration). You’ll need to switch it back to the correct position to restore power.
How often should I check my battery switch connections for corrosion?
Ideally, check them at least once a year, or more frequently if you live in a humid climate or frequently use your travel trailer.
Can I use a battery switch to connect a generator to my travel trailer?
No, a battery switch is only for managing battery power. You’ll need a separate transfer switch to safely connect a generator to your RV’s electrical system.
My battery switch is making a clicking sound. What’s wrong?
This could indicate a problem with the switch itself, corroded connections, or a low battery. Check connections first; if the issue persists, the switch may need replacing.
